Graphics Interchange Format, shortly or commonly known and called as a 'GIF', is a file format for animated images.
This wiki along with its respective pages uses GIFs to showcase different character poses for both playable characters and opponents. This tutorial will guide users on how they can create.
See this section of the Style Manual for advice on adding gifs to pages.
Thank you Starmapo5, JillOfTrades, NaughtySk8r, and Unauu for making these tutorials. We appreciate your service.
Preparation
- An image editing program
- A program to view XML files (Notepad works)
- A sprite sheet and XML file (optionally JSON file) for a desired character
- Time and patience (Optional)
Desktop
(A little note: Ezgif can only rip sprites under or on 1200 pixels. If there are files over this limit, you can use Photopea to create larger GIFs.)
- Open up the sprite sheet PNG and XML/TXT of the character you want.
- In the XML/TXT, find the name of the animation you want. For example, in Boyfriend's XML sheet his idle animation is called "BF idle dance".
- Now this tutorial will split this into two parts, for both XML and TXT files.
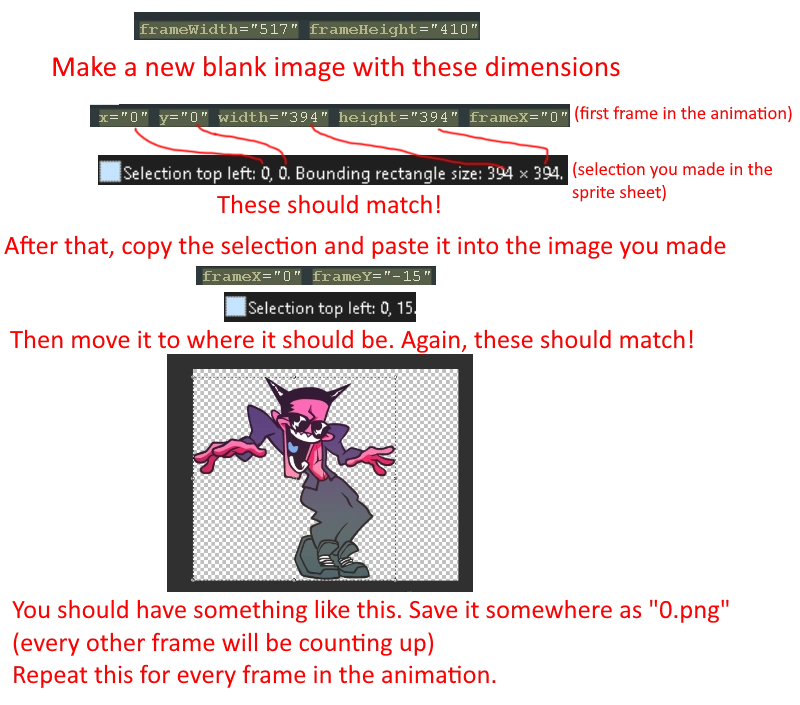
- There should be a "frameWidth" and "frameHeight" for all the frames of the animation, which should stay consistent throughout. In your image editor make a new image with that exact same width and height. If there isn't a consistent "frameWidth" and "frameHeight" for all the frames (like for Mid-Fight Masses characters), you'll have to resize this image corresponding for every frame. Thankfully you shouldn't come across this very often.
- For each frame you want to select at the X and Y that frame says to, as well as make it the width and height that frame says to. I'll assume you're using paint.net, there should be some text at the bottom once you select, you want to make sure that "Selection top left" is the same as the X and Y that the frame in the XML file says, and "Bounding rectangle size" is the same as the width and height of that frame. You can use the arrow keys to move around the selection, and grab the sides of the selection box to change the width/height.
- After you have your frame correctly selected, copy it and then in the new image you created a bit ago paste it in. Now you'll have to position that frame as the "frameX" and "frameY" says to. Kind of the same thing as last time, position the "Selection top left" as the frameX and frameY (not the same ones you used last time). Also important, ignore the negative signs! Pretty much in paint.net a negative X or Y means the selection goes out of the frame and you don't want that do you. So don't pay attention to the minuses and only the numbers.
XML
- There should be a "frameWidth" and "frameHeight" for all the frames of the animation, which should stay consistent throughout. In your image editor make a new image with that exact same width and height. If there isn't a consistent "frameWidth" and "frameHeight" for all the frames (like for Mid-Fight Masses characters), you'll have to resize this image corresponding for every frame. Thankfully you shouldn't come across this very often.
- For each frame you want to select at the X and Y that frame says to, as well as make it the width and height that frame says to. I'll assume you're using paint.net, there should be some text at the bottom once you select, you want to make sure that "Selection top left" is the same as the X and Y that the frame in the XML file says, and "Bounding rectangle size" is the same as the width and height of that frame. You can use the arrow keys to move around the selection, and grab the sides of the selection box to change the width/height.
- After you have your frame correctly selected, copy it and then in the new image you created a bit ago paste it in. Now you'll have to position that frame as the "frameX" and "frameY" says to. Kind of the same thing as last time, position the "Selection top left" as the frameX and frameY (not the same ones you used last time). Also important, ignore the negative signs! Pretty much in paint.net a negative X or Y means the selection goes out of the frame and you don't want that do you. So don't pay attention to the minuses and only the numbers.
Txt
(Read the XML text above so you understand this section!)
- There should be 4 numbers for all the frames. The first two correspond to the X and Y while the last two correspond to the width and height. The width and height should be the same across all the animation frames so the new image file should be of that width and height.
- For each frame you want to select at the X and Y that frame says to, as well as make it the width and height that frame says to.
- After you have your frame correctly selected, copy it and then in the new image you created a bit ago paste it in. As these TXT files don't have frameX or frameY, you do not have to worry about positioning here.
Saving
After that, you can save the image file somewhere. It is recommended to make a folder specifically for them, and naming them in numerical order, so the first one would be "0", then "1", then "2" and so on and so forth. Why start at 0? Well the XML file also starts at 0 so that helps you not get confused with the numbering.
Repeat this process for every single frame of the animation. It may sound tedious, but once you get the hang of it, it really isn't that bad. Just time-consuming. Also more often than not there'll be duplicate frames (frames that have the exact same X, Y, width, height, etc.), for this you can just save the image multiple times in a row.
Note the frames may sometimes have residue (stuff that shouldn't be there), this is due to the way Adobe Animate generates these spritesheets to save space thus stacking frames on top of each other, you can remove them manually.
After you have all the frames needed, you can go to a gif-making website (a good option is ezGIF) and upload the frames. With few exceptions, use 40 milliseconds in between frames (use 4 instead of 40 if you're using ezGIF). For singing characters, the delay of the final frame should usually be longer than the others.
Your gif should be done now! If your gif needs cropping, you can go to ezGIF to crop it. Usually the best solution is to just select "trim transparent pixels around the image".
Art Programs
FireAlpaca
FireAlpaca is one of the many free art programs that can be used to separate a sprite sheet.
Either drag and drop the sprite sheet into the program directly, or click "File" in the top left corner, then "Open..." and select the sheet from there.
Next, use either the Rectangle Selection tool or the Freeform Selection tool to select the frames of an animation.
![]() From top to bottom, "Rectangle Selection, Freeform Selection, Wand Selection".
From top to bottom, "Rectangle Selection, Freeform Selection, Wand Selection".
Copy them with Ctrl + C, then click "File" in the top left corner, then "New..." Start with an 800 x 800 canvas and paste the frames with Ctrl + V.
If the canvas is too small, click "Edit" in the top left, "Canvas Size..." (or press "S" with the menu open), and change the 800 to a higher number. Ensure that "Delete Cropped Area" is not ticked.
Center the first frame, then find the list of layers and click the icon with two papers, this will duplicate the selected layer. (Alternatively, one can copy and paste each individual frame into the canvas.)
Move the duplicated layer until the second frame is lined up over the first frame, and repeat with the next frames.
Afterwards, remove the excess around the frames with the freeform selection tool. Circle the excess and press Shift + Del on the keyboard to delete the excess from all layers (make sure all layers are visible first).
An alternative would be to circle the character themselves, then click "Select" in the top left, then "Inverse", then press Shift + Del.
Once done, use the Wand Selection tool and click away from the character. This will highlight the character blue. Click "Select" in the top left and then "Inverse" to highlight the outside blue, then click "Edit" in the top left, then click "Crop". This will crop the canvas to the nearest visible pixels.
Once the canvas has been cropped, click "File" then "Export Layers (Animation Mode)..." and select a folder to export the separated frames to.
Go to a site called EZGIF and in the "GIF Maker", insert the frames and create the GIF.
If something doesn't line up, return to FireAlpaca to make adjustments. If the speed is too fast or too slow, change the number in the "Delay Time" box.
To see video examples, see Gallery of Video Tutorials.
GIMP
Preparation
- GIMP
- XML File
- Spritesheet of a character. (Athena will be used as an example.)
- Ezgif Free to use website to crop gifs.
Tutorial
- Make a new file, remember to put FrameWidth and FrameHeight on the dimensions and delete the background!
- Put the spritesheet in a folder to organize the frames.
- Duplicate file and crop the frames. It is highly recommend naming them in numeral order.
- Put the files in Gimp (You can just drag & drop), preferably one at a time, and sync it together by the bottom of the frame.
- Once the GIF looks as you please, go to File and click "Export As" & name your gif. You'll need to figure out where to put your exported gif so it is suggested to make another folder to keep it in!
- When a pop-up comes up, do not panic! Click Crop and put these options. (The 90 milliseconds is optional, you can change it however you like.) Then click 'Export'.
- After your GIF is exported completely, go to Ezgif and click the 'Crop' button. Then choose the file and press 'Upload'.
- Scroll down and check the box "trim transparent pixels around the image" & click crop image. It should show the final GIF right below it.
- Click save and rename your completed gif.
")
")
")
")
")
")
")
")
")
")
Notes:
- The GIFs saved by GIMP can only have 256 colors total. One of these colors is actually used for transparency, leaving 255 opaque colors.
- Partial transparency is not supported by the GIF format.
- The color reduction algorithm used by GIMP is not that well-suited for cartoon-like images, since it tends to miss colors that are very common in the image, causing colors to differ between the spritesheet and the GIF.
- It is possible to save in Gimp's XCF format or the Tiff format to preserve all the color information, but the file should be converted to GIF using another program.
Paint.net/LibreSprite/Aseprite
Welcome to the Funkipedia Mods Wiki. So, you want to help contribute to the wiki by providing sprites? Then you've come to the right place. For those who have experience in sprite animation or any form of frame-by-frame animation, most of this may be familiar to you. For those who don't know about picture editing or not even know what a GIF is, this may be complicated.
We're going to start from the beginning, but we'll be delving into the hard parts first since that will make things easier in the long run. It may be hard to understand and may take some time, but take it easy and don't put too much pressure on yourself.
(And if anyone has a problem with any 'imperfection' you present, tell them to do it themselves. That'll make them shutup.)
This guide has two versions: A "For Dummies" one, and a TL;DR for people who don't want to read or are familiar with the basics. If you just want to jump in, go to Step 3.
Programs
Before we begin, please note that this tutorial is based on PC for Windows. Macintosh and/or any OS may vary the steps or may be obsolete for this.
In order to get our feet wet, we need programs in order to get things done. Bigger does not always mean better, and you don't have to pay hundreds-hell, anything to get an animation to work.
While the traditional programs provided could help, it can make things complicated in the long run. So what should we use?
In order to get the frames (plain pictures that are combined to animate) from the sprite sheet (picture containing all the frames for animations) in order to animate, we'll need a simple paint program.
Paint.net is a widely popular and free program. This will give us the ability to easily grab and modify the frames we'll need to animate. It will also include helpful tools such as rulers and layers (top to bottom parts of a picture to display as one) to help position and see the frames.
Next, we'll need a program to animate. There are various programs out there. LibreSprite is a free animation program that can be used to animate the frames needed. Asesprite is the same, but a paid program with a different license. The difference between the two is that LibreSprite is the old, outdated version of Asesprite, while Asesprite is an up-to-date version. If you already have Asesprite, you can go ahead and use that. Otherwise, LibreSprite is all you need as it gets the job done.
TL;DR:
Programs needed:
paint.net
LibreSprite/Asesprite
Paint.net and LibreSprite/Asesprite interface
Now let's get to the interface of Paint.net for those using it for the first time.
Paint.net has a lot of uses and tools, but we only need a few of them to grab what we need. Here, we'll be focusing mainly on the following:
Rectangle Select:
This allows us to select an area at an even aspect ratio (where width is the same as height). With it, we can select the individual frames needed from the sprite sheet.
Move Selection:
Note that I am going over "Move Selection" here, not "Move Selected Pixels." We'll get to that next. This is a useful feature that'll help us fine-tune the frame we want selected. The frame you select will not always be at an even aspect ratio. With the "Move Selection," we can get the exact size and the exact location needed easily without any need to keep using "Rectangle Select" over and over until we hit that sweet spot.
Copy, Cut, and Paste:
Now that we know what we want, we'll need to copy it of course. This can be done two ways. On PC, you can just do the keyboard shortcut (ctrl+c) to "Copy," or select "Edit" from the drop down menu in the top left and select "Copy." This will add it to your clipboard (copy of the selection). If you're running any other programs that has a clipboard with multiple selections, this can get complicated, so it's best to close those programs or assume that you have only one thing to copy and paste.
Instead of "Copy," and if you're comfortable with modifying the sprite sheet, you can use "Cut" instead. This copies the selection, but removes it as well. On PC, you can do the keyboard shortcut (ctrl+x) to cut, or select "Edit" from the drop down menu and select "Cut." This can be useful if a sprite has a lot of frames, and you're having trouble keeping up with it. Just use caution.
Now for "Paste." Again, there are two ways to do this. On PC, you can use the keyboard shortcut (ctrl+v) to "Paste," or select "Edit" and select "Paste."
There are three types of paste. You can simply paste on the picture, on a new layer, or a brand new image.
When you paste on the picture, it's a flat out paste, meaning it's right on the picture and overwriting any pixel-whether it's empty or not.
When you paste as layer on the picture, it creates a new layer over the picture. Same size, same position, but you can toggle it to display on or off. Think of it as an individual selection within the same picture.
When you "Paste as a new image," it creates an entirely new image. We will mainly use this one for our empty frame needs.
Move Selected Pixels:
Now we get to the "Move Selected Pixels." Same as the "Move Selection," but different. Instead of just the selection being moved, the pixels within the selection are being moved as well. When you paste into a new image, "Move Selected Pixels" is automatically on for the new image. Moving the selected pixels with a mouse can be tough sometimes, but you can move it pixel-by-pixel using the arrow keys on the keyboard.
TL;DR for Paint.net:
We're only focused on the following tools below:
Rectangle select is used to select an area on the sprite sheet.
Move Selection can be used to change the size of the selection.
Cut or Copy (remove and copy or just copy respectively).
Pasting on the picture overrides whatever was on it.
Pasting as a layer on the picture pastes into the picture, but as a separate entity.
Pasting as a new image creates a new, individual image of the picture.
Move Selected Pixels moves the pixels that are selected. You can use the arrow keys to move it bit by bit.
Remember, "Move Selection" is for selecting the area, "Move Selected Pixels" moves the actual pixels.
Now let's get to LibreSprite/Aseprite.
The good news is that there isn't much we need to do or learn for this program, as the majority of it will be automated for us. Once we open it up, we are met with a simple homescreen of recent files and such. We need to make sure some things are set up, however, before we get back into that program. First, let's get a new sprite started. Just go to "File" then "New," and select "Ok" on the window. Right now, the size and specifications don't matter. We are focused on the interface at the moment.
Once that new file is up, select "View" and then select "Timeline." This is the main aspect of what gets our animation to...well, animate. In the Timeline section, right click on the "1," which is our first frame of the animation, and select "New" or "New Empty Frame." Repeat that step again until we have three frames "1, 2, 3" shown.
Drag the mouse over the frames until you have all of them selected. Right click, then select "Properties."
This is the duration of the selected frames. By default, each frame is 100 milliseconds. It's highly recommended that the milliseconds for each frame stays consistent and the same. The more milliseconds you increase it by, the slower. The less you decrease it by, the faster. So if you double all the frame durations to 200, then it will be much slower. If you half it to 50, it will be much faster.
If you're doing a different animation program, please at least have the duration in milliseconds. Other measurements such as "FPS" (Frames Per Second) may not turn out accurate.
A special thing to note is that the more frames you have, the less milliseconds you should put on for each frame. The less frames you have, the more milliseconds you should put on for each frame. Also, not every sprite is the same as it can animate differently on different mods. At that point, we would have to eyeball it (measure by what we see).
Now that we are familiar with the basics, let's finish this. Go to "File" then Select "Save as..."
The "+"s on the file explorer are folders. The filenames are the type of files in the folder. In the drop down menu on the same window, select the arrow near "All Formats." After that, select "gif files."
Press "Ok" and another window will pop up. Be sure "interlaced" is unchecked and "Animation Loop" is checked. If this is not checked, then the animation will not repeat.
So now we are familiar with the interfaces of two programs, let's get started on getting our first animation going.
TL;DR for LibreSprite/Aseprite:
Be sure that the animation timeline is open by selecting "View" and then "Timeline."
Create new frames by right clicking "New" or "New Empty Frame."
Highlight the frame numbers, right click, select "Properties" in order to change the frame duration.
Frame duration for each frame should stay the same. By default, they are all 100 milliseconds.
The higher the millisecond duration, the longer and slower the frame lasts.
The lower the millisecond duration, the faster and shorter the frame is.
The more frames you have, the less millisecond each frame should have.
The less frames you have, the higher millisecond each frame should be.
Not all sprite animations are the same, so you may have to go by what you see.
Save the animation by going to "File," then "Save as...," select the box with "All Formats," select "gif files," and select "Ok."
"Interlaced" should be unchecked, "Animation Loop" should be checked.
The Works
Let's start with an easy one as the example. Let's look at the Mommy Mearest spritesheet.
Let's open up the MomCar Sprite Sheet with paint.net, which should be a PNG file. Because there are various mods and engines, the location will vary, so download the mod and familiarize with the location of the files.
Alternatively, use this file:
https://i.imgur.com/ODxTOh0.png
Alongside the Sprite Sheet, there should be an XML file with the same name. Open that with your notepad program.
Alternatively, you can use this:
https://drive.google.com/file/d/1DqD8otQfBp9MgRJZ9CJLC8_mlHyciEv1/view?usp=sharing
Preview:
https://i.imgur.com/c7jdRBQ.png
There are many lines for this, so this can be confusing. Right now, we want to do the idle stance of Mommy Mearest. On the Sprite Sheet we can pinpoint what we need by looking at it and finding the label for the idle stance. Most of the time they can be found with the name containing "Idle."
Now that we found out lines of text and we have the sprite sheet open, let's take a look at our interface.
https://i.imgur.com/VAACUAv.png
<SubTexture name="Mom Idle0000" x="2728" y="0" width="467" height="811" frameX="0" frameY="-2" frameWidth="479" frameHeight="814"/>
Here we see that the first frame will always start with the number 0, then 1, 2, etc. We see the x location of the first sprite, and the y location of the sprite. X is how far right the sprite is, and Y is how high up it is on it.
Let's start by selecting rectangle select in any location.
https://i.imgur.com/1qKtpBj.png
Notice on the bottom left there is more information. This will be key in getting our frames. Currently, our selection is beginning at x-2447, and y-854.
According to the lines, what we are looking for right now is x-2728, y-0. So we can assume first that the sprite is on the very top. Using rectangle select, try your best to get the first idle frame. This does not have to be in one shot.
After you have it selected, change your tool to "Move Selection." Make sure the top rectangle line is in the y-0 location, and the left rectangle line in x-2728 location.
Let's take a look at the bottom left location. We are familiar with the x and y locations. Now we get to the selection size of it.
On the lines of text, we notice the width is 467 and the height is 811.
So in translation, our selection starts at x-2728, y-0, with the size of 467 width and 811 height.
Right now, this should be your selection and what you should have at the moment. You may have to zoom in the picture a bit (bottom right) in order to get the exact measurements.
https://i.imgur.com/KUw0UnS.png
Now the last measurement is the frame width and frame height. These measurements should stay consistent in each type of animation in the xml file. The width is 479 and the height is 814. Let's create a new picture file by going to File, then New.
https://i.imgur.com/NiTdaVl.png
https://i.imgur.com/gMHBHZX.png
We need to make it transparent, so let's do that real quick by selecting "Edit" then "Select All." Select "Edit" again then "Erase Selection."
https://i.imgur.com/IhQVIrr.png
We're going to need more than one frame of this. According to the lines of text, there are 14 frames to this. Remember, the first frame always starts with 0, so think of it as 13 frames plus 1.
Let's go to "Edit" again then "Select All." Select "Edit" again then "Copy." "Edit" again, then "Paste Into New Image." Do this 13 times until you have 14 empty frames.
https://i.imgur.com/xvHQkRm.png
Now we can get started. Let's go back to the sprite sheet where our sprite is still selected, then copy it. After that, "Paste" into the new empty image. (If the empty image is in selection mode, just press ESC on the keyboard to get rid of it before pasting it.)
https://i.imgur.com/YPrtgaP.png
Keep that sprite selected on the new image as we are not done yet. If you deselected it, just go to "Edit" then select "Undo." That will get it selected again.
Let's look at our final piece of the text. We see "frameX" as 0 and "frameY" as -2. This is the direction we have to move that sprite that is already selected on the picture. We have to make sure the location of our frame is, according to the bottom left, at the location of x-0 and y-2. Ignore the negative signs on "frameX" and "frameY." We are focusing on the positive numbers.
Let's move our frame as stated above: to x-0 and y-2. It will be pretty easy to do this using our arrow keys.
https://i.imgur.com/QIqsmxE.png
Now we can deselect it. Congratulations! You got your first frame done! Now it's time to save.
Go to "File," "Save As..."
Since this is our first frame, we will name the file "f0" and save it as PNG file. This is important as other normal file formats do not support transparency. Just select "Ok" to save the file. We don't need any special settings for it.
I know you're tempted to name it "f1." While it is not wrong, it can be confusing to keep up with the xml file, so I HIGHLY recommend to name it "f0."
You can do m0, t0, d0, etc etc-as long as there is a number at the end of each frame in order. This will make things easier when we animate it.
This is going to take a while, so repeat the steps for the next xml lines until you have all frames. You can press enter if you like to separate the lines you're done with. Take your time too! This will take some time to get used to it. For fun, with your saved frame files open, you can toggle them to see how they look when they animate.
Now you'll come across one that will be complicated.
<SubTexture name="Mom Idle0012" x="485" y="824" width="460" height="814" frameX="-4" frameY="0" frameWidth="479" frameHeight="814"/>
We have to pay attention to the x and y coordinates this time. Remember, left side is the location of x, and the top line is the location of y. The size of the selection is 460 width and 814 height.
https://i.imgur.com/26RDbhm.png
So, let's copy that and paste it into our next empty image. Don't forget to keep it selected when you do! Pay attention to the "frameX" and "frameY" locations, so we move the image to x-4 and y-0.
And the last piece of text for the sprite. Since this uses all of the requirements, let's go through it one last time.
<SubTexture name="Mom Idle0013" x="955" y="824" width="471" height="812" frameX="-4" frameY="-2" frameWidth="479" frameHeight="814"/>
The selection begins at x-955 and y-824 on top. The width of the selection is 471 and the height of the selection is 812.
https://i.imgur.com/NzWsMGr.png
Let's paste that into our final empty image. The location we need to move it to is x-4, y-2.
https://i.imgur.com/5QMZF2K.png
And we finally have our frames for Mommy Mearest!
TL;DR:
In order to get his done, you will need two files: the sprite sheet file and the xml file of the same name.
Open the sprite sheet with paint.net and xml file with notepad.
The bottom left are the measurements of the selection.
x is how far left the selection is, y is how far top the selection is.
The width and height are the size of the selection. Width is how far right the selection is, height is how far down the selection is.
"frameWidth" and "frameHeight" at the end are consistent for the frame sizes, so be sure to paste them in an empty image at that exact same dimension.
"frameX" and "frameY" are the locations of the selection when you paste it on the empty image. Ignore the negative symbols and focus on the number.
"frameX" is how far you move it to the left or right, and "frameY" is how far you move it to top or bottom.
Each frame should be saved in PNG format. Be sure to save them as a letter and number file. For example, "f0," "f1," "f2," etc.
The Animation
With our frames completed with the exact dimensions and locations, we can now open up LibreSprite/Asesprite. Once we have the program open, let's open up one of the frame files. Once we try to open it, we are greeted with this message. https://i.imgur.com/IhqBPXB.png
Select "Agree" and voila! Our frames are all placed in one area! Press play and enjoy the fruits of your labor!
https://i.imgur.com/4kZNOiZ.png
The animation seems slow, of course. The rule we went through previously is the more frames it has, the less each frame should last. The less frames it has, the more each frame should last.
Let's select all our frames, right click, and select "Properties."
This is the point where we are "eyeballing" it for now, so set the time to 40 milliseconds.
Now press play to test it out!
Let's save the animation. Go to "File" then "Save As..."
Make sure you select to save as a "gif" file.
Now the way we name files may vary, but one rule of thumb is charactername first, then pose type. So we have Mommy Mearest in Idle pose. Let's name it "MommyMearestIdle.gif".
A message will pop up. I will go over this in a bit. For now, select "Yes."
https://i.imgur.com/RtM2yad.png
Make sure "Interlaced" is unchecked, and "Animation Loop" is checked.
Notes to remember:
Gifs cannot have any semi-transparent color (only a boolean alpha channel). If it has any transparent color, it translates it to that color. If there is no color, it translates to as an empty pixel.
When you zoom in or out on viewing the sprite. It looks like the quality has lessened. This is because the GIF file format only supports 256 colors per frame.
Note that if you use a different program, results and conversion may vary, so it's highly recommended to use these programs shown in this tutorial. If you know what you're doing, then go ahead.
TL;DR:
Open up LibreSprite/Asesprite and open up one of the frame files.
Select Agree to open them all at once.
Press play to see if the animation plays correctly.
Finding the speed is "eyeballing" it, so select all frames, then properties, and select the time the frames last.
Remember, the higher the millisecond, the longer the frame lasts. The lower the millisecond, the shorter the frame lasts.
More frames means less frame time. Less frames mean more frame time.
Gifs can only have all-or-nothing transparency (or alpha channel).
The quality of the gif depends on the colors of the original spritesheet.
The best way to name the gif file is the character and type of pose it is in.
https://i.imgur.com/virpoMs.gifv
And we're finally done with our first sprite animation! If you want to share your results from this tutorial, go ahead (but please upload your results to another location, not the wiki!). If you have any questions, feel free to post. If you feel like I didn't cover something accurately or completely, let me know. -JillOfTrades
Mobile users
Many of the programs above only work for desktop computers, but Ezgif and Hans5958's TextureAtlas Extractor can be used on mobile.
Best Cropping
What you need:
- Image editing program (Again, highly recommend paint.net or GIMP)
- The image you want to crop (most likely an icon).
1. Crop around the area of the image you want. Doesn't have to be perfect, just make sure not to get parts of other sprites you don't want.
2. Select the Magic Wand and set it to flood mode "Global" (the one with the raining cloud) and 0 tolerance. This will make it so once you select a pixel, it will select every single one of that pixel over the entire image. Select a completely transparent pixel, then invert the selection (Ctrl+I) and then crop to selection (Ctrl+Shift+X). Alternatively, in GIMP, use Image > Crop to Content, which ensures that nearly invisible but important pixels aren't removed. This'll give you the best cropping possible! Sometimes though there'll be some residue semi-transparent pixels which will mess with the cropping, just delete those manually and redo the cropping process.
Tutorial Videos
Resources
- Starmapo5's Wiki Guide
- NaughtySk8r's How to make GIFs, Gimp Tutorial
- Rickhenrique's Ripping Tutorial
- Source Code
 Spr2Png, an automatic sprite extractor by i-winxd on GitHub
 - Source Code Sprite Extractor On The Go, another sprite extractor
- Source Code Spritesheet and XML Generator, another sprite extractor
- GitHub TextureAtlas Extractor by Hans5958 on GitHub
